How To: Custom Web Part Properties (ToolPart)
I’ve been getting a few requests from people who basically want to know how you can modify the Web Part Properties window – and foremost add your own logic and controls there.
Prerequisites
- SharePoint 101 basic knowledge
- Knowledge about how you build and deploy Web Parts in SharePoint
- (Really, you can just download the entire project in the end of this article and skip the pre-reqs.)
Intro
I will walk you through how you can add your own custom controls in the Web Part property pane, instead of relying on the standard controls.
Sometimes you’re just required to have a bit more advanced controls put in place which the default functionality can’t deliver. That’s where the ToolPart comes in handy!
In this case the ToolPart will do a lookup and see what Lists (SPListCollection) exists on the current site, and populate a simple DropDownList with the values.
**Important note
**I havn’t fully implemented the properties etc. in this Web Part in a manner you would preferbly do it – I’m simply focusing on the topic of the custom toolpart.
Overview
Default property pane (in this case, ListViewWebPart for Contacts)

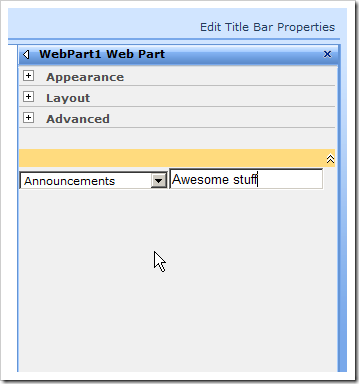
Custom ToolPart pane with custom logic for the controls
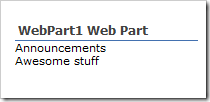
Example of using the Web Part properties in the Web Part
Walkthrough
-
Launch Visual Studio (2008 in my case)
-
Create a new Web Part in your preferred way (I actually used the Extensions for WSS for once..)
-
WebPart1.cs Add the properties you want to your webpart > public string Property1
> {
> get
> {
> return _property1;
> }
> set
> {
> _property1 = value;
> }
> }
> string _property1;
> public string Property2
> {
> get
> {
> return _property2;
> }
> set
> {
> _property2 = value;
> }
> }
> string _property2; -
WebPart1.cs Override the Render()-method in order to simply output the properties we just created > protected override void Render(HtmlTextWriter writer)
> {
> base.Render(writer);
> writer.Write(Property1);
> writer.Write("
");
> writer.Write(Property2);
> } -
WebPart1.cs Override the GetToolParts()-method in order to alter the toolpane > public override ToolPart[] GetToolParts()
> {
> ToolPart[] allToolParts = new ToolPart[3];
> WebPartToolPart standardToolParts = new WebPartToolPart();
> CustomPropertyToolPart customToolParts = new CustomPropertyToolPart(); > > allToolParts[0] = standardToolParts;
> allToolParts[1] = customToolParts;
> allToolParts[2] = new CustomToolPart(); > > return allToolParts;
> }
What we’re doing here is firstly instantiating the WebPartToolPart class which gives us the standard toolpart. Next we’re adding the CustompropertyToolPart which adds a custom property toolpart. Finally we’re adding our CustomToolPart to the collection of ToolParts and then we’re returning the collection – telling SharePoint that this is how we want it to render!
- CustomToolPart.cs Create a new class called CustomToolPart and derive from Microsoft.SharePoint.WebPartPages.ToolPart > public class CustomToolPart : Microsoft.SharePoint.WebPartPages.ToolPart
> {
> DropDownList ddl;
> Panel toolPartPanel;
> TextBox tb; > > protected override void CreateChildControls()
> {
> toolPartPanel = new Panel();
> ddl = new DropDownList();
> ddl.ID = "ddl"; > > // Simply getting the lists of the current web, and displaying them in the dropdown-list.
> SPListCollection lists = SPContext.Current.Web.Lists;
> foreach (SPList list in lists)
> ddl.Items.Add(list.Title); > > tb = new TextBox();
> tb.ID = "tb"; > > toolPartPanel.Controls.Add(ddl);
> toolPartPanel.Controls.Add(tb);
> Controls.Add(toolPartPanel);
> base.CreateChildControls();
> } > > public override void ApplyChanges()
> {
> WebPart1 wp = (WebPart1)this.ParentToolPane.SelectedWebPart;
> wp.Property1 = ddl.SelectedValue;
> wp.Property2 = tb.Text;
> }
> }
The only noteworthy thing in this class is the override of ApplyChanges which basically tells our WebPart (this.PartenToolPane.SelectedWebPart is WebPart1) that it should set it’s properties to the values in the custom property toolpart we’ve created.
Summary & Download
That was easy enough – this was just a really swift intro to how you can manage your own controls and behaviour for your webparts properties.
You may download the VS2008 project here.
Enjoy


Recent comments