WSPBuilder - Walkthrough of the Visual Studio Add-in
Alright. People have approached me lately and asked me if I could give them a brief introduction to the WSPBuilder extensions available for Visual Studio. Instead of taking all those discussions on one by one, I’ve decided to document some of the main features here. If I’m missing out on something, please let me know and I’ll fill it up.
Bil Simser did a survey with the SharePoint MVP’s and summarized the foremost favorite CodePlex projects in this article.
In this article I will cover one of my favorite tools – WSPBuilder.
WSPBuilder background
A SharePoint Solution Package (WSP) creation tool for WSS 3.0 & MOSS 2007
No more manually creating the manifest.xml file
No more manually specifying the DDF file
No more using the makecab.exe application
Carsten Keutmann, an MVP and friend in Copenhagen is the brilliant mind behind this awesome application.
The idea behind the WSPBuilder add-in for Visual Studio is that it’s based on any normal "Class library" template – which means that you can easily copy your entire WSPBuilder project to a machine that doesn’t have WSPBuilder and still be able to open the project. – This is something you can’t do with a lot of other extension tools (say, the VSeWSS for example)
WSPBuilder Installation
Just download the latest release of the "WSPBuilder Extensions – Visual Studio Addin" and let the installation guide take you through the most simple process ever – clickety click.
Creating a WSPBuilder project
When you have installed the add-in to Visual Studio, you should now be able to create a new project based on the "WSPBuilder" template.
To kick this off, let’s create our WSPBuilder project:
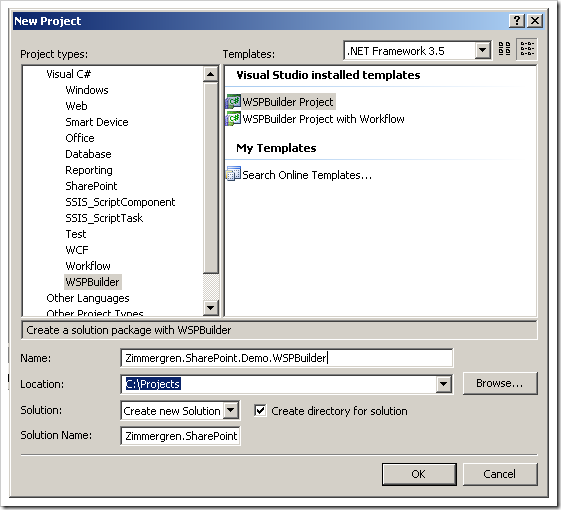
Note: You don’t have to create a WSPBuilder template, you can create a normal Class Library as well. The only thing about a WSPBuilder template is that it will automatically create the "12" folder along with a temporary strong-key so you don’t have to do that right now.
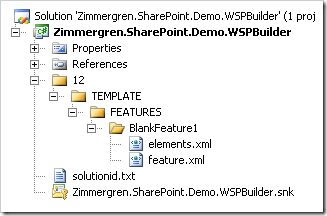
When you’ve created the project, you’ll see a structure like this one in your solution explorer:

The WSPBuilder will create the 12-folder, since it’s good practice to start your projects from the 12-root. It will also add the file "solutionid.txt" which contains a GUID to be used on the .wsp package, for easy reference. You will also get a strong-key generated for you so you don’t have to worry about signing your project right now.
Alright, now that we’re up and running with a blank WSPBuilder project – we should start by adding something to the solution.
WSPBuilder Templates – Overview
In an ordinary fashion, right click on the project and choose Add – New item.
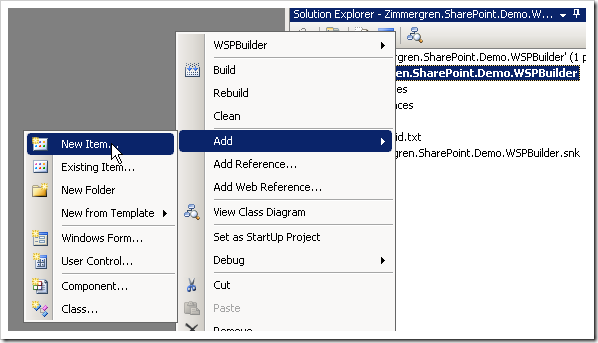
Choose the "WSPBuilder" node and you will see an overview over the available templates like this:
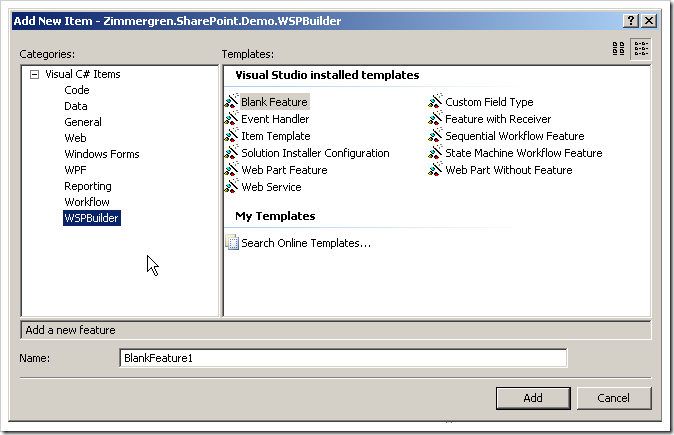
Let’s walk through each and every one of them! The joy! :-)
Blank Feature Template Overview
A blank feature does exactly what the name implies, it creates a blank feature for you!
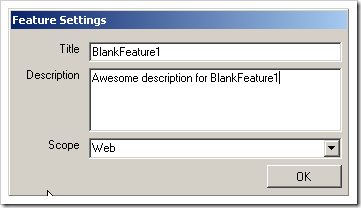
I’m creating a blank feature, and naming it to "BlankFeature1" so we easily can distinguish it from the other folders created later on.
With WSPBuilder, when you create a new item based on a template, you’ll get a dialog asking you for some variables – and since this is a feature, it’s going to need a Title, Description and of course a Scope:
Your solution tree will be populated with a few new things, in this case the BlankFeature1 that we chose to create:
As you will see, you get not only the perfectly correct 12-hive structure – you will also get the feature.xml and elements.xml files created for you, and the feature.xml file can look like this:
Event Handler Template Overview
With the Event Handler item template, you will not only get the correct 12-structure in your solution – you will also get the reference to "Microsoft.SharePoint.dll" added automatically, since an event handler requires some talking to the SharePoint Object Model.
We will get our feature.xml and elements.xml as normal – but this time the elements.xml is pre-populated with some tags to hook up our event handler:
  <XmlDocuments>
     <XmlDocument NamespaceURI="http://schemas.microsoft.com/sharepoint/events">
        <Receivers xmlns:spe="http://schemas.microsoft.com/sharepoint/events">
          <Receiver>
            <Name>AddingEventHandler</Name>
            <Type>ItemAdding</Type>
            <SequenceNumber>10000</SequenceNumber>
            <Assembly>Zimmergren.SharePoint.Demo.WSPBuilder, Version=1.0.0.0, Culture=neutral, PublicKeyToken=b7201b5590fd1fc0</Assembly>
            <Class>Zimmergren.SharePoint.Demo.WSPBuilder.EventHandler1</Class>
            <Data></Data>
            <Filter></Filter>
          </Receiver>
        </Receivers>
      </XmlDocument>
    </XmlDocuments>
As you can see, the elements.xml file is referring to the assembly called Zimmergren.SharePoint.Demo.WSPBuilder and a class called EventHandler1.
With the magic of WSPBuilder, this class has of course also been created for us and will look something similar to this:
using System;
using System.Collections.Generic;
using System.Text;
using Microsoft.SharePoint;
namespace Zimmergren.SharePoint.Demo.WSPBuilder
{
    class EventHandler1 : SPItemEventReceiver
    {
        public override void ItemAdded(SPItemEventProperties properties) { base.ItemAdded(properties); }

        public override void ItemAdding(SPItemEventProperties properties)
        {
            base.ItemAdding(properties);
        }

        public override void ItemUpdated(SPItemEventProperties properties)
        {
            base.ItemUpdated(properties);
        }

        public override void ItemUpdating(SPItemEventProperties properties)
        {
            base.ItemUpdating(properties);
        }
    }
}
Solution Installer Configuration
If you’ve ever used the SharePoint Installer from CodePlex, you know that when you want to use it with your own .wsp file you need to do some adjustments to the configuration xml.
With the Solution Installer Configuration template you will get this configuration automatically created and hooked up with your project. The Setup.exe.config file might look like this:
Web Part Feature
This is by far one of the most popular templates, as it crates a generic template for your web part and also creates the feature for provisioning the Web Part to the Web Part Gallery.
You will get the elements.xml file configured something like this:
and you’ll get the required .webpart file configured something like this:
<?xml version="1.0" encoding="utf-8" ?>
    <webParts>
        <webPart xmlns="http://schemas.microsoft.com/WebPart/v3">
            <metaData>
                <type name="Zimmergren.SharePoint.Demo.WSPBuilder.WebPartFeature1,
                    Zimmergren.SharePoint.Demo.WSPBuilder,
                    Version=1.0.0.0,
                    Culture=neutral,
                    PublicKeyToken=b7201b5590fd1fc0" />

                    <importErrorMessage>
                        Cannot import WebPartFeature1 Web Part.
                    </importErrorMessage>
            </metaData>
            <data>
            <properties>
                <property name="Title" type="string">WebPartFeature1</property>

                <property name="Description" type="string">
                    Description for WebPartFeature1
                </property>

            </properties>
        </data>
    </webPart>
</webParts>
and you will get the WebPartFeature1.cs file created automatically (or whatever you choose to name it) and it usually look like this:
using System;
using System.Collections.Generic;
using System.Runtime.InteropServices;
using System.Web.UI;
using System.Web.UI.WebControls.WebParts;
namespace Zimmergren.SharePoint.Demo.WSPBuilder
{
    [Guid("a043d73d-7418-4918-baed-828a2bc77019")]
    public class WebPartFeature1 : Microsoft.SharePoint.WebPartPages.WebPart
    {
        private bool _error = false;
        private string _myProperty = null;

        [Personalizable(PersonalizationScope.Shared)]
        [WebBrowsable(true)]
        [System.ComponentModel.Category("My Property Group")]
        [WebDisplayName("MyProperty")]
        [WebDescription("Meaningless Property")]
        public string MyProperty
        {
            get
            {
                if (_myProperty == null)
            {
                _myProperty = "Hello SharePoint";
                }
                return _myProperty;
            }
            set { _myProperty = value; }
        }

        public WebPartFeature1()
        {
            this.ExportMode = WebPartExportMode.All;
        }

        ///
        /// Create all your controls here for rendering.
        /// Try to avoid using the RenderWebPart() method.
        ///
        protected override void CreateChildControls()
        {
            if (!_error)
        {
                try
                {

                    base.CreateChildControls();

                    // Your code here…
                    this.Controls.Add(new LiteralControl(this.MyProperty));
                }
                catch (Exception ex)
                {
                    HandleException(ex);
                }
            }
        }

        ///
        /// Ensures that the CreateChildControls() is called before events.
        /// Use CreateChildControls() to create your controls.
        ///
        ///
        protected override void OnLoad(EventArgs e)
        {
            if (!_error)
        {
                try
                {
                    base.OnLoad(e);
                    this.EnsureChildControls();

                    // Your code here…
                }
                catch (Exception ex)
                {
                    HandleException(ex);
                }
            }
        }

        ///
        /// Clear all child controls and add an error message for display.
        ///
        ///
        private void HandleException(Exception ex)
        {
            this._error = true;
            this.Controls.Clear();
            this.Controls.Add(new LiteralControl(ex.Message));
        }
    }
Web Service Template
The following files will be automatically created for you:
- 12\LAYOUTS\WebService1.asmx
- WebServiceCode\WebService1.cs
WebService1.asmx may look like this:
<%@ WebService Language="C#"Class="Zimmergren.SharePoint.Demo.WSPBuilder.WebService1,Zimmergren.SharePoint.Demo.WSPBuilder,Version=1.0.0.0,Culture=neutral,PublicKeyToken=b7201b5590fd1fc0" %>
WebService1.cs may look like this:
using System;
using System.Web;
using System.Web.Services;
using System.Web.Services.Protocols;
namespace Zimmergren.SharePoint.Demo.WSPBuilder
{
    [WebService(Namespace = "http://tempuri.org/")]
    [WebServiceBinding(ConformsTo = WsiProfiles.BasicProfile1_1)]
    public class WebService1 : System.Web.Services.WebService
    {

        public WebService1()
        {
        }

        [WebMethod]
        public string HelloWorld()
        {
            return "Hello World";
        }
    }

}
Custom Field Type Template
The Custom Field Type template will create all the necessary files to get up and going with a Custom Field Control.
The following files will be generated and populated:
- 12\TEMPLATE\CONTROLTEMPLATES\CustomFieldType1FieldEditor.ascx
- 12\TEMPLATE\XML\fldtypes_CustomFieldType1.xml
- FieldTypeCode\CustomFieldType1.cs
- FieldTypeCode\CustomFieldType1Control.cs
- FieldTypeCode\CustomFieldType1FieldEditor.cs
The contents in these files are too much to bring up in a single blogpost, so if you’re thrilled about seeing what they look like – create your own project and dig in :-)
Feature With Receiver
Does what it says it’s supposed to do. Creates a FeatureReceiver and all required files.
- 12\TEMPLATE\FEATURES\FeatureWithReceiver1\elements.xml
- 12\TEMPLATEF\EATURES\FeatureWithReceiver1\feature.xml
- FeatureCode\FeatureWithReceiver1.cs
Feature.xml might look like this:
FeatureWithReceiver1.cs might look like this:
using System;
using System.Collections.Generic;
using System.Text;
using Microsoft.SharePoint;
namespace Zimmergren.SharePoint.Demo.WSPBuilder
{
    class FeatureWithReceiver1 : SPFeatureReceiver
    {
        public override void FeatureActivated(SPFeatureReceiverProperties properties) { throw new Exception("The method or operation is not implemented."); }

        public override void FeatureDeactivating(SPFeatureReceiverProperties properties)
        {
            throw new Exception("The method or operation is not implemented.");
        }

        public override void FeatureInstalled(SPFeatureReceiverProperties properties)
        {
            throw new Exception("The method or operation is not implemented.");
        }

        public override void FeatureUninstalling(SPFeatureReceiverProperties properties)
        {
            throw new Exception("The method or operation is not implemented.");
        }
    }
}
Sequential Workflow Feature and State Machine Workflow Feature Templates
Creates the necessary files to get started with your Sequential Workflow code.
- 12\TEMPLATE\SequentialWorkflowFeature1\elements.xml
- 12\TEMPLATE\SequentialWorkflowFeature1\feature.xml
- WorkflowCode\SequentialWorkflowFeature1.cs
- WorkflowCode\SequentialWorkflowFeature1.designer.cs
The same routine applies to the State Machine Workflow Feature template.
Web Part Without Feature
Finally, you can create a Web Part without the feature – basically just creating the .webpart file and the .cs file.
- 80\wpcatalog\WebPart1.webpart
- WebPartCode\WebPart1.cs
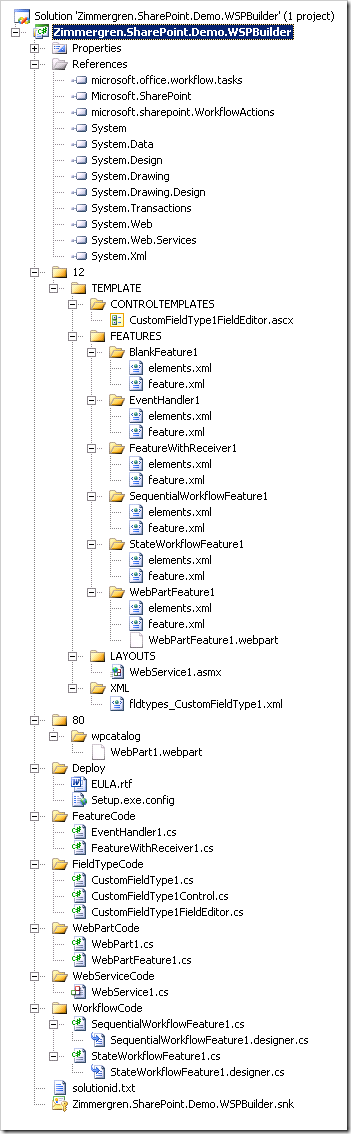
Solution tree overview
Since I’ve been bashing all kinds of templates in here, you’ll see that there’s a huge tree of files – all automatically created in less than 1 minute.
Template Overview Summary
Alright, the templates I’ve been mentioning before are great to get rolling with a new SharePoint project. But what about deployment of this solution? How do we create our .wsp file, and how do we choose where the files should land (Global Assembly Cache – GAC – or the /bin folder?)
That’s what the next section is all about – bringing some clarification to how the WSPBuilder creates your packages.
WSP Creation and Deployment with WSPBuilder
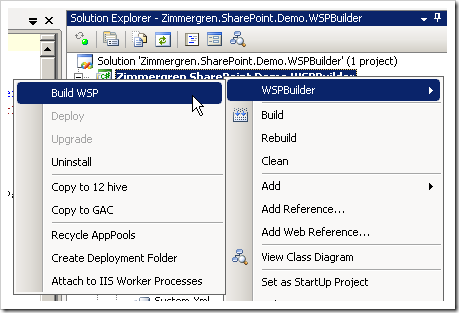
So, when we’re satisfied with our awesome project and want to build a .wsp package from it – we can simply choose to right click the project -> WSPBuilder -> Build WSP and it will automatically create the .wsp for us:
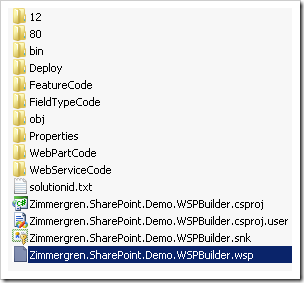
This will create a .wsp file in your project folder like so:
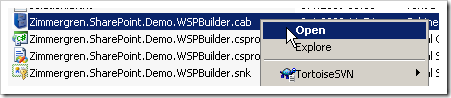
Now, if you want to check the contents of the .wsp package, you simply rename the .wsp file to** .cab** and open it, like so:
Manifest.xml
In the cabinet (.wsp package) you will find the file called Manifest.xml – this is the file that tells SharePoint where to actually deploy the solution – GAC or BIN.
If you don’t do any changes at all, this file will look something like this:
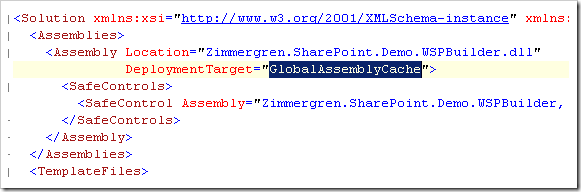
As you can see, the DeploymentTarget is set to "GlobalAssemblyCache"** ** and your dll will go into the GAC.
Now, in this particular case we can not deploy to the /bin folder anyway – as we have types in our assembly that MUST go into the GAC (Workflows and EventReceivers are two of those types).
But if we were to have a Web Part project or what not – and we want to deploy it only to the /bin folder, follow along with the next few steps.
Scoping the assembly for BIN instead of GAC (including Code Access Security generation)
Okay. So you don’t want it in the GAC, but in your BIN folder instead. That’s okay, just follow along with these few simple steps:
- Remove your /bin/debug folder entirely from your solution (make sure the .dll gets wiped)
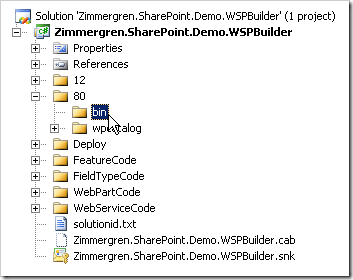
- If the 80-folder in your project root isn’t created – create it - Create a folder called "bin" folder in the 80 folder
- Your solution tree should look something similar to this:
- Right click your project and choose "Properties"
- Choose the "Build" tab
- Change the Output path from "binDebug" to "80bin":

When you build your project now, your .dll should pop into the "80bin" folder in your solution tree like this:

Ready to Rock – Scoping the assembly for the /bin folder
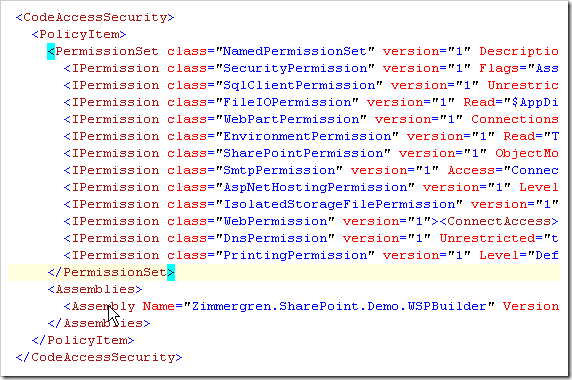
If we go about building our .WSP package again (right click project – WSPBuilder – Build WSP) and rename the .wsp to .cab and check the manifest.xml file – we should see two things done different:
- DeploymentTarget is set to WebApplication (any chosen WebApp, e.g. /bin)
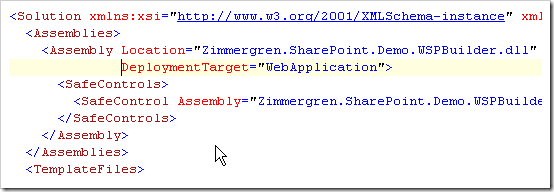
- Some general CAS (Code Access Security) permissions has been automatically added to make your assembly run:
Deployment with WSPBuilder
Okay. So we’ve created our project, scoped it either for GAC (do nothing) or for /bin (make the changes in the previous section) – and we want to deploy it. What do we do?
- Right Click the Project -> WSPBuilder -> **Deploy
**Your output window will show something like this:
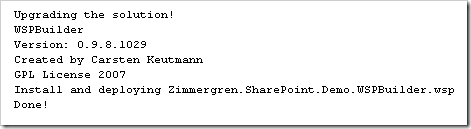
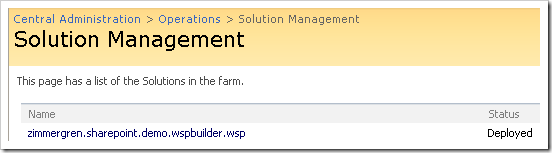
Check your Solution Management in Central Administration under the tab "Operations" and make sure it’s successfully deployed:
Conclusion and Summary
This post simply walks through some of the more popular features of the WSPBuilder created by my pal Carsten Keutmann in Copenhagen.
If there’s any questions or comments – please add them in the comments section below


Recent comments